Using Word Styles
- Amanda Clarke
- Dec 6, 2023
- 3 min read
Updated: Aug 25, 2025
Word Styles are used to make the formatting across a document consistent. It allows changes such as font, size, spacing, indentation, weight and colour to be made to the text without having to make manual changes each time a type of text appears. Using Styles means that every piece of a manuscript can be formatted with the click of a button after some initial setup. This maintains consistency throughout the document and saves time by avoiding manual formatting.
The Styles Tools can be found on the Home Tab.

Applying a Style is simple:
Select the text you would like to label as a specific Style.
Click on the desired Style in the Style Panel. You can also create a new Style.
Styles apply to paragraphs as a whole. It is not possible to have multiple Styles within a single paragraph. If a specific word or sentence needs to be formatted differently than the rest of the paragraph, these changes must be made manually.

Any text labelled with a Heading Style will appear in Word’s navigation panel (ctrl + F on a PC, command + F on a Mac) under Headings for easy navigation through the document.
Modifying an Existing Style
There are two ways to modify an existing Style:
Select the text to be modified and make the changes manually. Once you are happy with how the text looks, right-click on the Style to be modified and select Update to Match Selection. This will automatically update every piece of text that is labelled with that Style to match your changes.
Right-click on the Style you would like to modify and select Modify... This will open up a new window where changes can be made. These changes will be applied to all the text labelled as that Style once you click OK.


Selecting Automatically Update means that any changes made to a piece of text will be applied to all text labelled with that Style without having to go through the above steps.
Note: Do not click Automatically Update if you will need to make manual changes to individual words/sentences as it will prevent you from doing so without changing all text of that Style.
A Style can be renamed by selecting Rename... from the same drop-down menu. For base Styles that Word provides, the default name will be retained in some views.
Creating a New Style

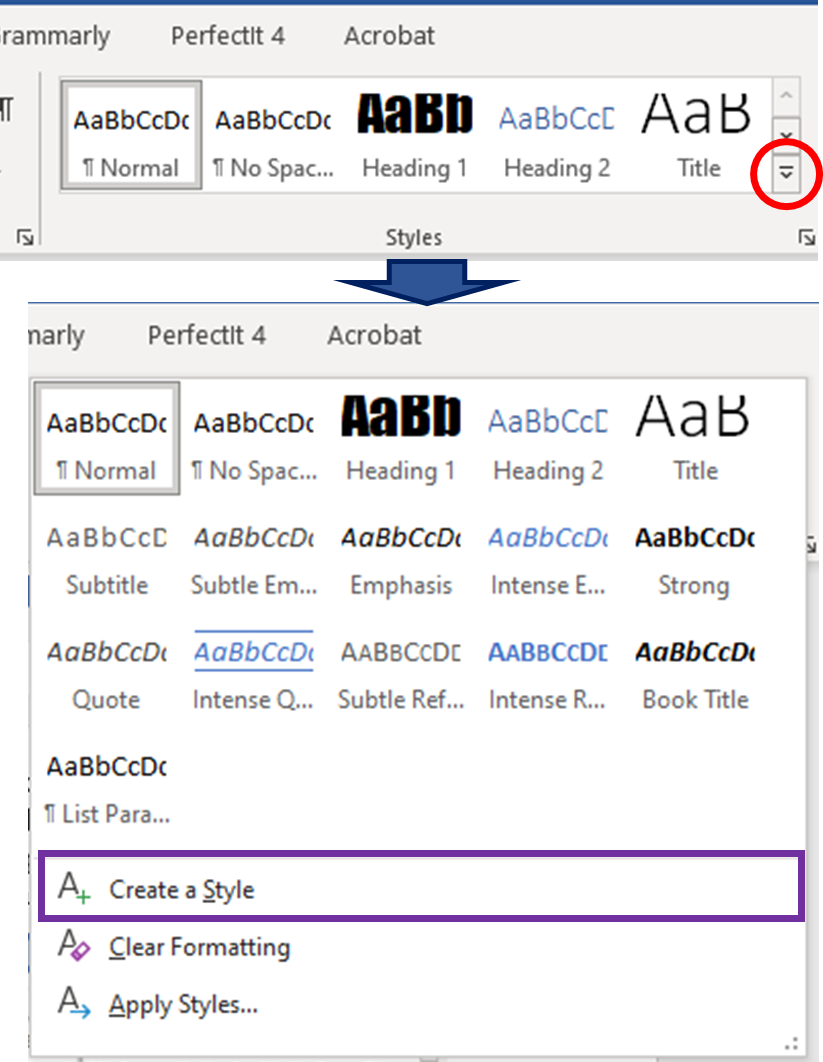
Click the down arrow on the right-hand side of the Style panel. Click on Create a Style. A small window will pop up where you can name the Style and see a preview of what the new Style will look like.
If the text for the new Style is already formatted to your liking, highlight the text before clicking Create a Style. The highlighted text will be used to format the new Style. If no text has been highlighted, then changes to the Style can be made by clicking Modify... (See Modifying an Existing Style above)

Managing Styles
The Style Gallery is the quick access to Styles seen on the Home Tab. Unused Styles can be removed from the gallery by right-clicking on the Style and selecting Remove from Style Gallery. This allows you to streamline this list to only the Styles currently in use in the document.

Clicking the arrow in the lower right-hand corner of the Style Gallery will open a Styles pop-up window. This window will provide a full list of every Style that is currently active in the document, even if there is no text assigned to it. From this list, you can create new Styles (A+) or manage Styles as you would from the Style Gallery. This view also allows you to see more Styles without scrolling than the Style Gallery does, but it does not give a preview of what each Style looks like.
The main function the pop-up window allows that the Style Gallery does not is the ability to delete a Style from the document. Right-click on the Style you'd like to delete and select Delete Style. Base Styles provided by Word cannot be deleted, but they can be renamed. Keep in mind that once a Style has been deleted, any text labelled with that Style will revert to the Normal Style.


Comments